

Creating a MongoDB Organisation
- We register from the MongoDB official site -> mongodb.com
- We go to the organisations page from this link.
- Click on the green button named "Create New Organisation" on the top right.
2: Organisation Building Steps

- Choose a name for your organisation from the place shown in the picture.
- Select where it says "MongoDB Atlas" at the bottom.
- Press the green button that says Next.
- Press the green button named "Create Organization" on the page that opens.
3: Create MongoDB Atlas Project
- Log in to your organisation page.
- Press the green button named "New Project" on the top right.
- Give your project a name and press the Next button.
- Press the green button named "Create Project".
4: Creating MongoDB Atlas Database (Cluster)

- Log in to your Project page from your Organisation page.
- Press the green button in the centre of the screen that says "Build a Database".
- Press the button named "Create" from the free section that says "Shared" at the end of the right.
- Select the properties in the picture and press the "Create Cluster" button.

- Write your username and password where you can access the database in the places shown in the picture. You determine this name and password.
- Press the green button named "Create User".

- From the menu on the left, click on the section labelled "Network Access".
- Click on the green button that says "Add IP Address".
- Click on the button that says "ALLOW ACCESS FROM ANYWHERE"
- Click the green button labelled "Confirm".
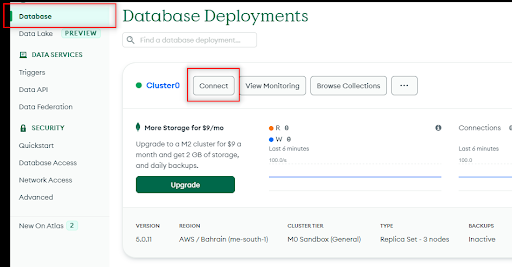
- Again from the left menu, this time click on the section labelled "Database".
- From the page that opens, click on the button that says "Connect" from the place shown in the picture.
- From the screen that opens, click on the 2nd box, that is, the section that says "Connect your application".
- The extension in the window that opens is your database access key. Example Below
mongodb+srv://test:<password>@cluster0.85rzldq.mongodb.net/?retryWrites=true&w=majority
NOTE: Definitely write your password by deleting the <password> part completely when writing your password, and delete the <> signs.
A key similar to this will be on your screen, this is your MongoDB Atlas database access key. You can access the mongodb database in your projects with your key by typing the password you set when creating a database access account in the section that says <password>.